Showing posts with label Do it yourself. Show all posts

Friday, August 1, 2014

DIY: A Gallery Wall with Purpose


I'd like to share a simple DIY or Do It Yourself activity. Okay, let's make a wall deco with quotes and you will love this for sure. 
It's an easy-makey and fun to make. All you need is to prepare the required materials and your little precious time.

Materials: 
(your prefer) Quotes / Images
Blank Band Paper or Photo paper
Printer
Styrofoam board
Glue stick
Sealer Gloss
Cutter and brush
Double side tape 
Thumb tacks

STEP ONE:
 First look and prepare your prefer quotes that you'd like to print. Images and photos of yourself are also great for wall deco. 
(What I made is a God's inspirational quotes, so I googled and print it.)

And oh don't forget to resize the images that you'll print just to make sure that their size are equally the same. (but of course it'll depend on your own gallery wall that you'd like to make.)

STEP TWO:
                After printing, cut your quotes or images and glued it with your styrofoam board. Use a cutter to trim the styrofoam. 

STEP THREE:
Now it's time to put some varnish. I used Padico Sealer semi gloss, but you can use mod podge as well or any sealer that will give shiny, shimmery and protection to the images.

 This how it looks likes when sealer gloss are already put-in, so shiny just like a photo paper.

LAST STEP:
After drying, at the back of the images or styrofoam, use a double side tape to put or stick it on your wall or you use a thumb tacks as well and put a double side tape on it and then there you go, you have your own gallery wall. Good-luck and have fun~!

Friday, November 16, 2012

New Pursuit ...

MY OWN BEAUT RACK RIBBON HANGING IN MY CRAFT WALL

I have a new pursuit to hone and to be hooked with; and it's making a Wood Crafts. When I was still in the Philippines, I do really wanted to make a wood crafts but sad to say I can't find a good materials for making a wood thingy so I can't pursue on creating some stuff.

And then voilĂ ~! It is my lucky day when I went to shop for some groceries and I saw a wood materials section. Of  course, I am so animated looking for something I can use on making my first wood crafts. 

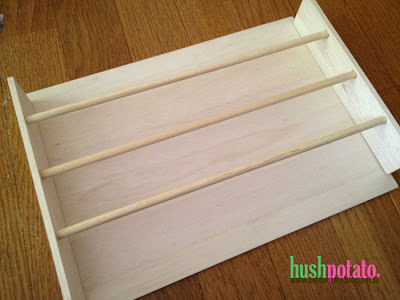
And here's the materials that I bought; (a) plywood sheet (b) round wood stick (c) hobby saw and (d) metal hang fittings 

I always envious seeing images of a wall rack ribbon and I know it was made of a professional maker that can buy at Interior Home Depot. And now I am gonna make my own wall rack ribbon "Yiheee.." though I don't have much materials for wood crafting maybe I can still make a way to create my new pursuits. 


Since I dont' have a wood drill I just  used my screw driver to make a hole.  I need to use a tape measure, ruler and pencil to create a guides. 

Look at the second hole, that's my first ever try screwing the wood, not a perfect one. So I also used the wood carving to sharpen the hole and a sand paper to smoothen the edges. 

And Hell Yeah! My hands are so freaking hurt but I love making it so I guess it is worth the pain. 

I also used the hobby saw to cut some excess edges and the wood stick as well. Sawing the wood are not that easy, I need to brew my stamina and focused on the guide lines or else it will be worse. 

I have my wood glue so I glued the sides. I wait for a matter of minutes or almost hours to dry and stick the wood permanently. 

And then I situated the round wood stick one by one. I don't have a wood paint but I wish I had so I can paint it or varnish my rack, in the end, the wood simplicity stays. 

Besides I am so thrilled to situate my ribbons and sightsee it in my wall. 

It's like I am so excited I just can't hide it! lol.


I prepared my ribbons to situate it on my new wall rack and Oh-em-gee! She's so Beaut! I am so happy with the outcome of my first wood craft and I can't wait for my next wood crafts to make, but If ever I am gonna make again, It will be a "mini cabinets"; it's on my wood crafts lists. Hehe! 

I am also thinking to make another wall rack ribbon but with a varnish or a wall-sticker-design-paper but It will be on my SALE section. Yeah I am planning to sell it and hope it will works. A Big G-luckies for me! 


Monday, October 8, 2012

Recycling Moments.

One day we bought a box of Aquarius which is like a water or an energy drink and a Coca-cola soft drink; a 2Liter in size that looks like a voluptuous woman. 

And then suddenly "Recycled" just cross into my mind. I told to myself once the bottle are empty I'll think something that I can possibly use for my stuff. 

So the bottle are empty. I thoroughly washed it, pouring some detergent inside the bottle, re-capping to close, then I shaked it upside down so it will wash the whole body. Since it's not easy to take away the detergent bubbles, I just leave the running water dripping to the mouth so the bubbles will go up and gone. 

Here's what I had in mind; I'd like to make a lamp on the top and a container with the bottom. But the result, I only just made the container. Since I don't have enough materials for the lamp, I'll skipped to it but once I have the materials like the bulb, I'll sort it again.

I was in-love with her body by being transparent, the color will stays and leave it as transparent. Maybe because I wanted to see my stuff that I am gonna put on my recycled container. 

Look what I did. This is the result, simple but useful. I situated my scissors, cutter, little roller, deco pen, and more on deco whip and sauce; and Tadah~! I had my own stuff container. So here's the images for the step. 

STEP ONE: Make a line on the bottom           STEP TWO: Carefully cut it with cutter.
                                           of empty bottle.

STEP THREE: Prepare your chosen fabric;     STEP FOUR: Place it at the top and wrap it 
          Make sure to size your fabric before you                                            and glue the fabric end.
                                               cut and fold it into a half.

STEP FIVE: Ready your desired ribbon;           STEP SIX: After wrapping the ribbon, 
wrapped it and then glue.                       cut those excess and stick it again.


STEP SEVEN: Have another ribbon                       STEP EIGHT: Paste it at the center.
                                             and make a loop like this.

STEP NINE: Make your own design.                                               STEP TEN: And here it is, 
 I have colorful balls and I stick it                                                        Simplicity at her best. 
                                 one by one to become a flower. 

I just hope I have shared some recycling moments. Don't fear to make your own. 
Everyone can recycled. Anyone can be artistic.